Saturday, July 12, 2014

How I Chose My Mission Luggage

When I first started looking for my mission luggage, I was going strictly for style.

Oh my goodness. What was wrong with me?

So foolish. 

This has to last me 18 months! 


One day, my mother and I were walking through the luggage department in Kohl's, when I saw the cutest luggage set. After we both died over the cuteness of this luggage, the sweetest Australian lady came up to me and said, "I don't mean to be nosey, but I wouldn't just go by style." She then proceeded to tell us a few things that could be considered luggage common sense. 

But if you don't have luggage common sense, like I did not, I'll help you get some! 

Here are a few things she told me:

Lightweight. 
The less your luggage weighs, the more your stuff inside can weigh! And just because it is labeled 'lightweight' does not mean it really is! Shoot for 9-10 lb. 

Color.
The luggage I loved was light purple. LIGHT? No, no, no. Choose something dark and sturdy, that wont show wear and tear over long periods of time. 

Material
Because of the type of place I am going to, she said I could choose canvas or hardshell - there aren't too many environmental restrictions. However, my friend who went to the Philippines wished she had bought hardshell because it floods a lot, and her luggage as soaked through multiple times! 

Carry On. 
Pack all your books and heavy things in here. There is no weight restriction on a carry on, so fill 'er up! (Also pack an extra outfit - just in case!) Also, she suggested that the dimensions of your carry on should add up to 41 inches for international standard. 

Luggage Tags. 
If you will be flying often, to forgo the luggage tags - everyone steals them! (How rude.) 

So, with this knowledge in hand, I searched high and low for my luggage!

I ended up with the Tommy Hilfiger Santa Monica Luggage Set from Macy's.

It's on sale right now, so if you want it, go get it! 


I actually paid a bit less than $440, because I did some type of delayed pick up which took 25% off of 50%. Then the lady found out I was going on a mission, and gave me a really awesome discount. (Which happens a lot, so you know, good conversation starter? ;))

And the tote is definitely an extra. It was one of those, "But Mom, it matches. It's just sooo cute. How can I go without it?" type of things. 

I couldn't be happier with my choice! I've used my carry on for a few trips already, and it was fabulous!

How did it measure up?

- My two large suitcases weigh about 11 lb. This was a dramatic difference compared to the 15 lb. light purple! You definitely can find lighter - but I decided that I will only be flying to the Mexico MTC and to my mission, and many things my mom will be shipping to me once I get to the field (winter and rain coat, bedding, ipod, etc.) I decided for those two flights, it's not that big of an issue. 

- Dark blue, with dark leather accents. NO DIRT. 

- Canvas. I decided because I am going stateside, and mostly a driving mission, that I will be fine with canvas. 

- My carry on is my favorite thing. First, it has push-button handle. Second, it will function great as a duffle bag for exchanges throughout my mission. It's also very lightweight!

- Luggage tags? I'm still on the fence. Maybe this one from Hobby Lobby. Decisions, decisions. 

How will you decide on your luggage?


Thursday, May 29, 2014

Format Talks to Look Like Scriptures

Many of my friends on missions often write home asking for a talk to be printed, because they need something other than their scriptures to read during personal study every morning. So, I decided I would bring along some of my favorite talks!

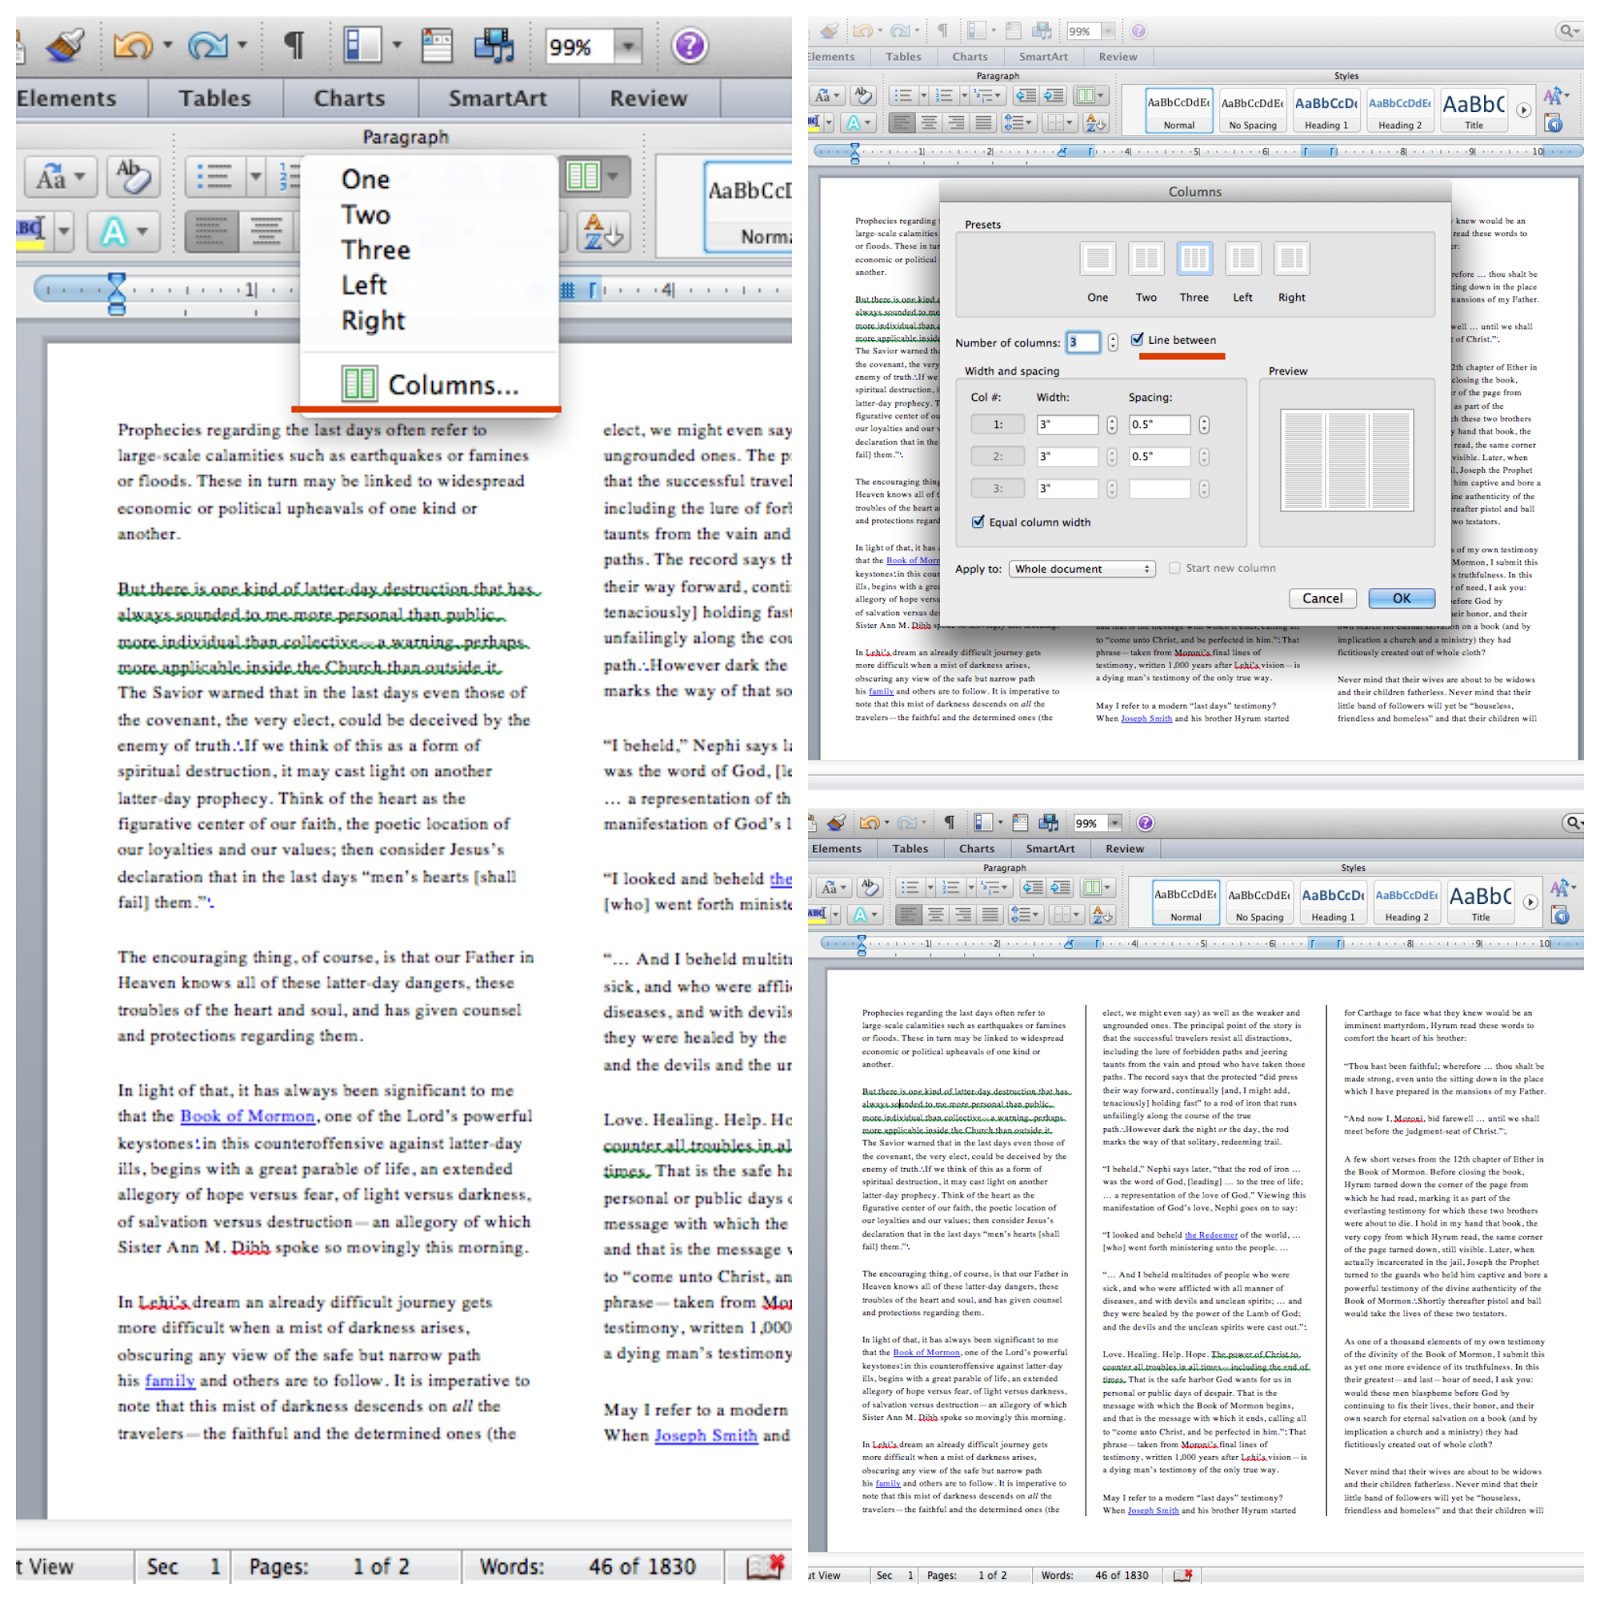
When I print out talks, I like to format them similar to the scriptures– it makes for easy study, and keeps them compact, so I don’t have 5 or 6 pages floating around.  I’ll show you how I do it!

1. Go to lds.org to find your talk – I chose Safety for the Soul by Elder Jeffery R. Holland.

2. Select the print option on the right hand side.

3.  Copy and paste the ‘meat’ of the talk into a new document.
  
   4. There will be hyperlinks throughout the talk that are underlined and colored in blue. I highlight the whole talk and reselect the black font color, and get rid of the underlining. The hyperlinks stay in place, but it looks clean for printing purposes.

55. Change the orientation to landscape, and adjust the margins to be as small as possible (This will depend on your printer’s margin allowances.) – I chose .5”.

  6. Format into three columns. To add the line of separation, go to the “Columns” drop down menu, and select “Columns…” then check the box that says “Line between.”


  7. Under the Line Spacing drop down menu select, “Line Spacing Options”, then check the box that says, “Don’t add spacing between paragraphs of same style.”


  8. Number the paragraphs for easy reference – I chose not to number scripture references, but italicized them instead.

9. Add the title and bold it for easy location.


  10.  Go back to the print version of the talk and copy and paste the footnotes to the bottom of the talk. You may or may not want to include these – I like to because there are many scripture references that I like to be able to study along with the talk. 
  *Microsoft word may number the footnotes in addition to the numbering already present. If so, click the “Numbered List” drop down menu, and select “None” under “Numbering Library.”


  11.  I like to keep my talks to 2 pages, so I can print them double sided. At this point, if the talk flows on to other pages, I usually tweak the font to make it all fit. This talk is formatted at a 10.5 point font.

12. Now it’s ready to print and study!

Which talks will you choose to bring along with you?

Sunday, May 25, 2014

Tips and Tricks for Mission Papers

This is the first step of the process, and it can seem a little scary at first! 
I made a million trips to the doctors office, a few calls from the bishop, and one from the Mission Call office, and I finally got my call! But don’t worry, your bishop is there to guide you through the process! I wish I had known what to expect, so here are a few questions answered, and tips to make it easier:


How long did it take to complete your papers?
It took me about 3 months to get my papers in. A lot of this was because I had decided to turn them in through my home ward, and I did all my medical examinations through my doctors at home. That meant a lot of trips home. But some kids have gotten their stuff together in 7 days, it just depends on the situation. My bishop said he usually likes to get papers going about 6 months beforehand so that there isn’t any rush – I think that’s good counsel.

How long did it take to get your call?
It took me about 2 weeks to get my call, and another half before I could finally open it. 2 weeks seems to be the norm, but as always there are exceptions: like that guy who got it in 4 days, or the other girl who waited 3 months. Again, it all depends on the situation.

Tips for your papers:

Get it done in one shot.
You can fill these papers out in a Sunday afternoon with your parents by your side. Print out all the medical forms, and be prepared to make all your appointments on Monday.

Get your wisdom teeth out. Today!
My dentist let me slide, and said I could turn in my papers without getting them out, as long as I promised I would do it before I go. I did have a friend, however, who had to get them out before she could turn her papers in. So, I say just get them out as soon as possible.

Bring your shots record to the doctors.
I didn’t bring mine with me, and that meant another trip to the doctors. Bring it with, so you can get caught up on all of your shots on the first trip.

Medical Questionnaire.
You can make this as painful as possible. Or you can use common sense. I chose the latter. It asks if you have problems with ingrown toenails. They aren’t asking if you have ever had an ingrown toenail. You don’t need to right about the time your toenail fell of when you were 3 years old. They just need to know if it’s a recurring problem, because, guess what? They will tell you to fix it.

Fix it Yourself.
If you do have problems with ingrown toenails, or any other simple thing like that, talk with your doctor about it on your first visit and get the treatment going.

If you have a special medical issue…
I have severe ankle issues, and I didn’t get as detailed as I should have been on the medical form. This meant extra trips to the bishop’s office, and a call from the Mission Office to get things clarified. Which meant delays on my call being assigned. There is an option for you to include documents pertaining to your condition. Include them. Describe your condition as detailed as possible – you don’t want to leave them guessing.

Be Honest.
If you do have a severe condition, don’t lie about it. First of all, it’s for your safety. Second of all, you probably will be able to serve, they just need to know what mission to put you in. Because of my ankle issues, the doctor from the Mission Department said, “I will recommend a driving mission, but we will see what the brethren say.” It’s usually not a question about IF you will serve, but WHERE you will serve.

Stake President Interview.
My stake president was awesome! He took down my phone number, and promised to text me whenever the status on my call changed. A lot of my friends wanted to ask, but didn’t want to bug their Stake President about it. So, just ask him to text you (or email, if he isn’t quite that tech savvy ;)) with any updates. Leaves the guessing game out!

Get excited!
This is when it really starts to feel real. You have been making plans for so long, and now it’s really happening! Enjoy every minute of it, and start telling people about it. Satan is going to start applying pressure, and the more people that know, the more people to support you.


Any mission paper veterans want to share their tips? Leave them in the comments below, I would love to hear what you learned!